

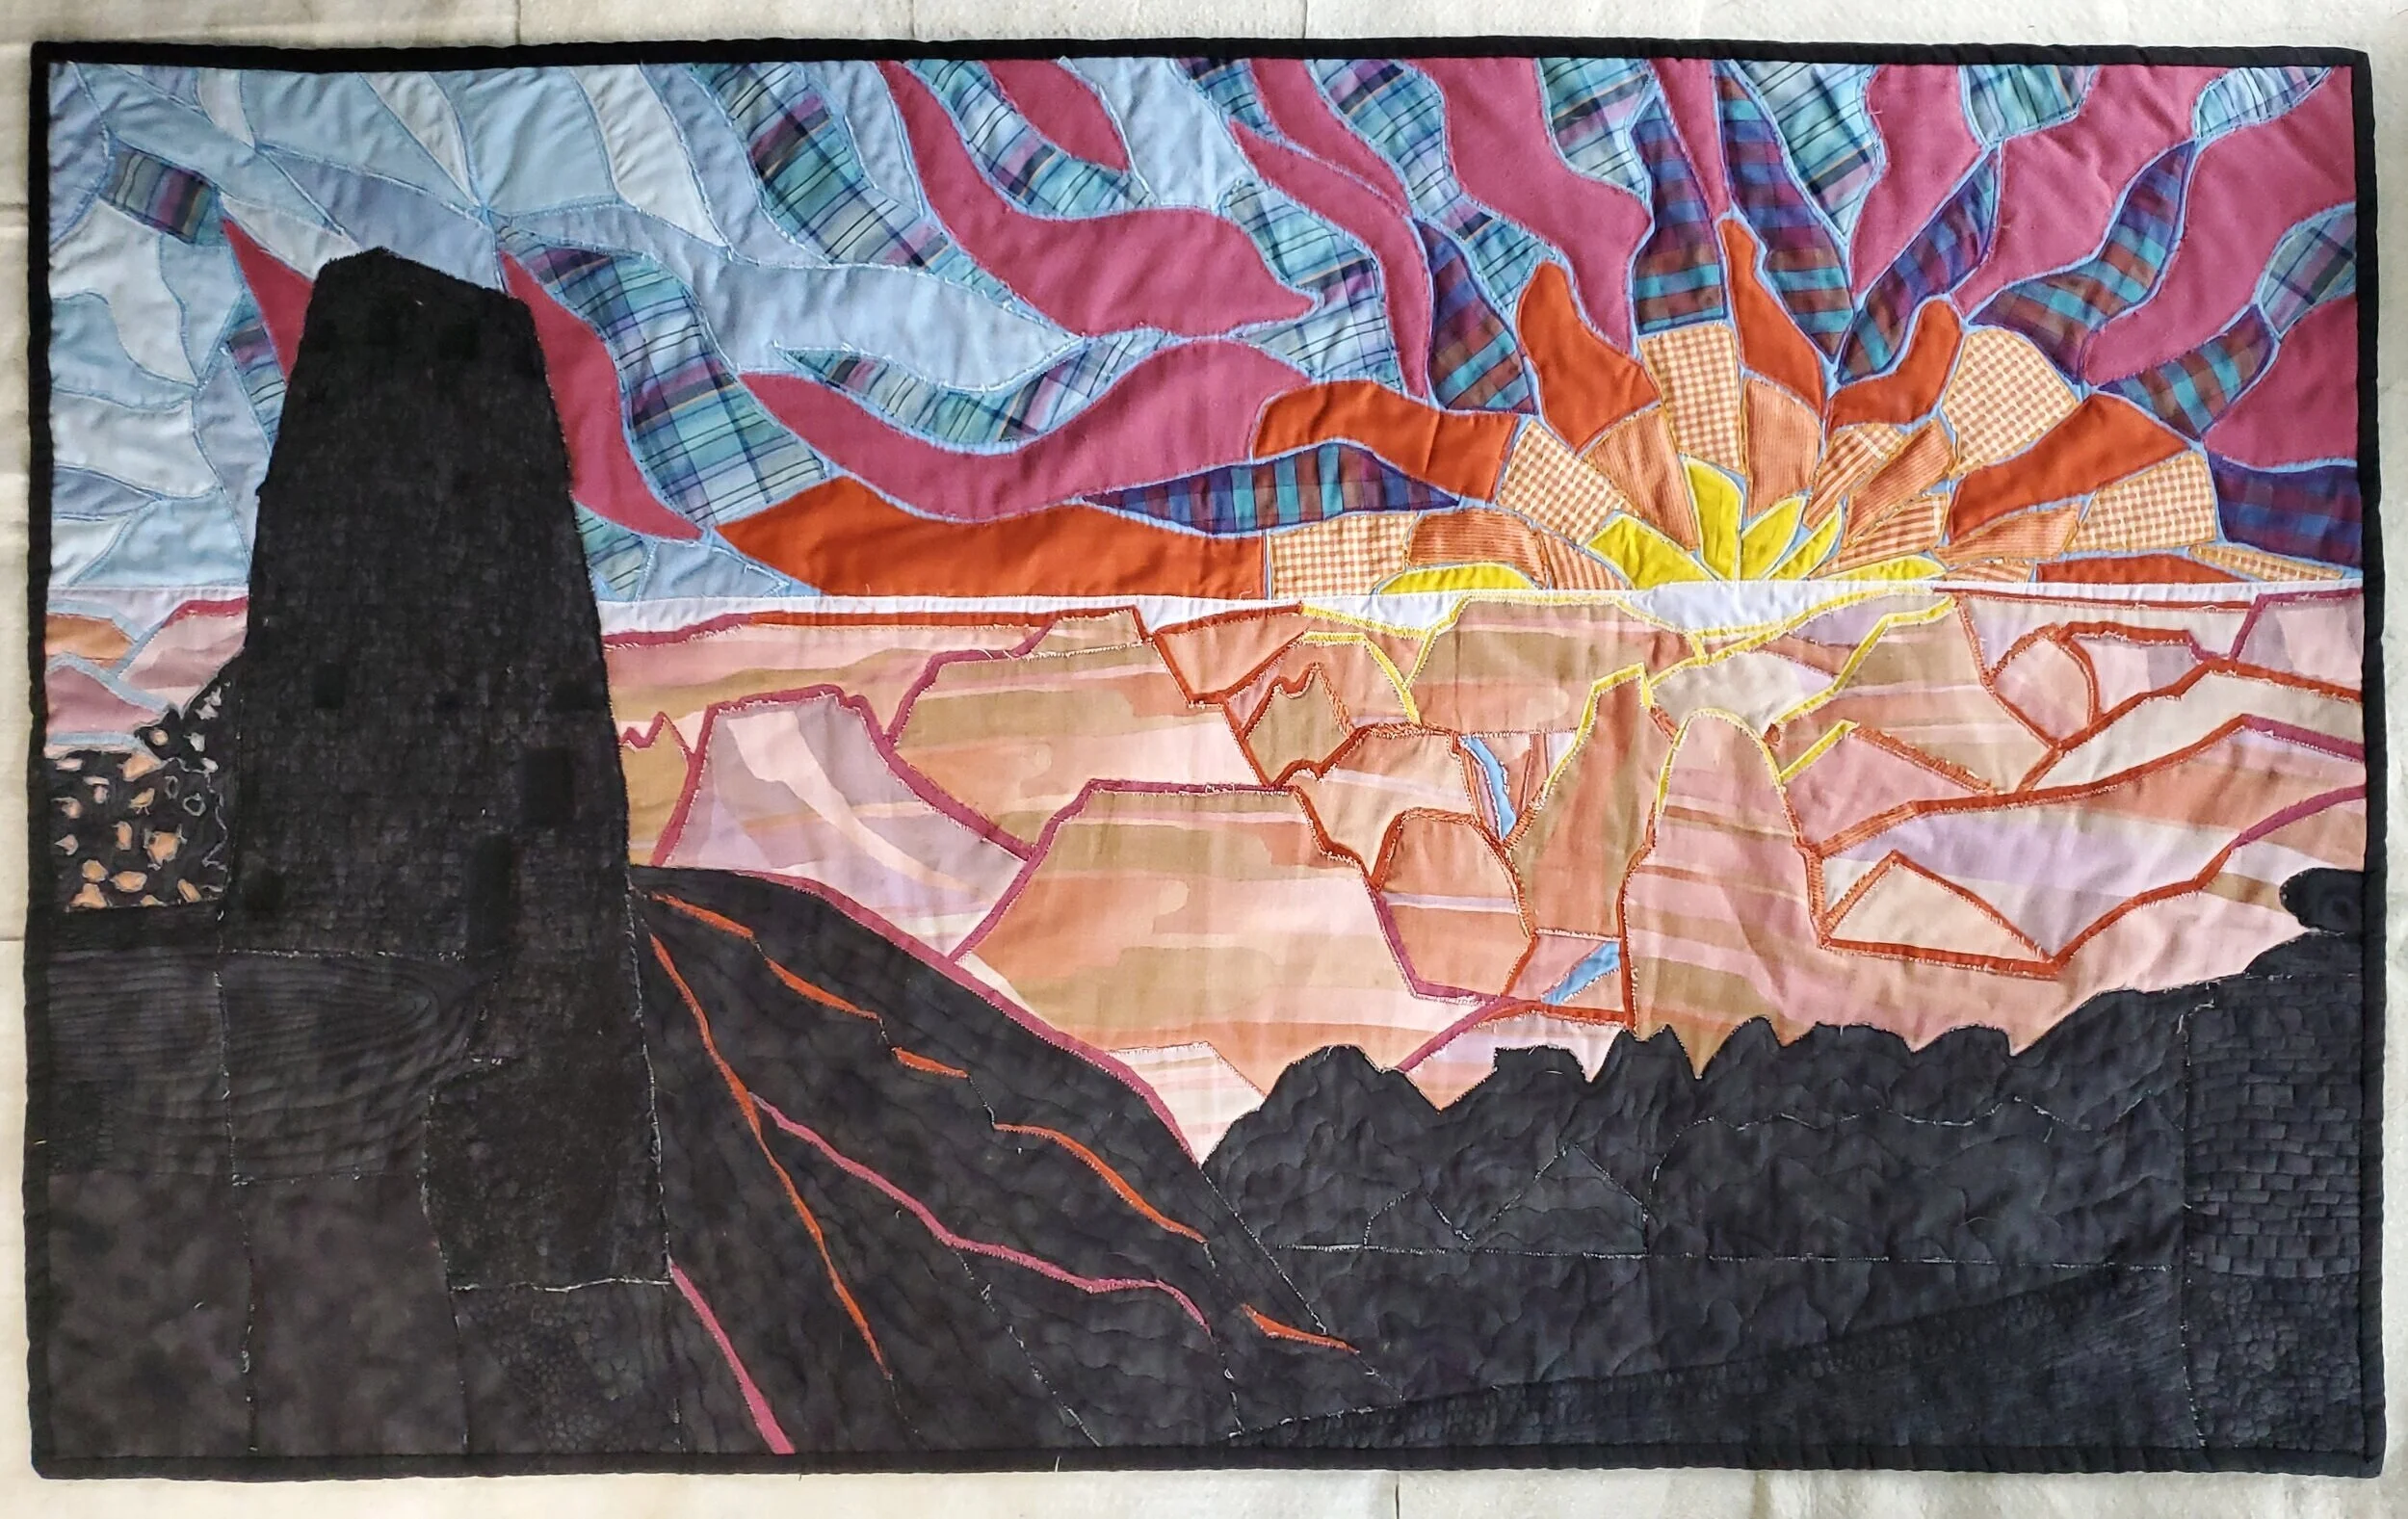
Grand Canyon Sunset : Bright Light in the Winter Night
By the Numbers:
3 Quilting Techniques
14 Different Fabrics Used
96.5 Labor Hours
225 Cut Fabric Pieces Used
This work was made in the dead of winter during quarantine. As an avid traveler, it was difficult to not be able to travel during the COVID-19 pandemic and with the darkness in the midst of winter, I wanted to work on something that was bright and hopeful.
I also had recently acquired fabric that looked exactly like the Grand Canyon and was simply too excited to not immediately use it.
Beginning Sketches
As with any kind of creative work, the first thing created was a rough sketch (or a few). My sketches are deliciously terrible and that’s the point. At this stage I’m just trying to get the idea out of my head onto paper so I can see it with clarity before diving in to the actual work.


In my initial sketches, I thought I would continue creating mosaic skies using the geometric shapes seen in traditional mosaics…
…That kinda changed as the work progressed and I wound up cutting more curvy pieces…
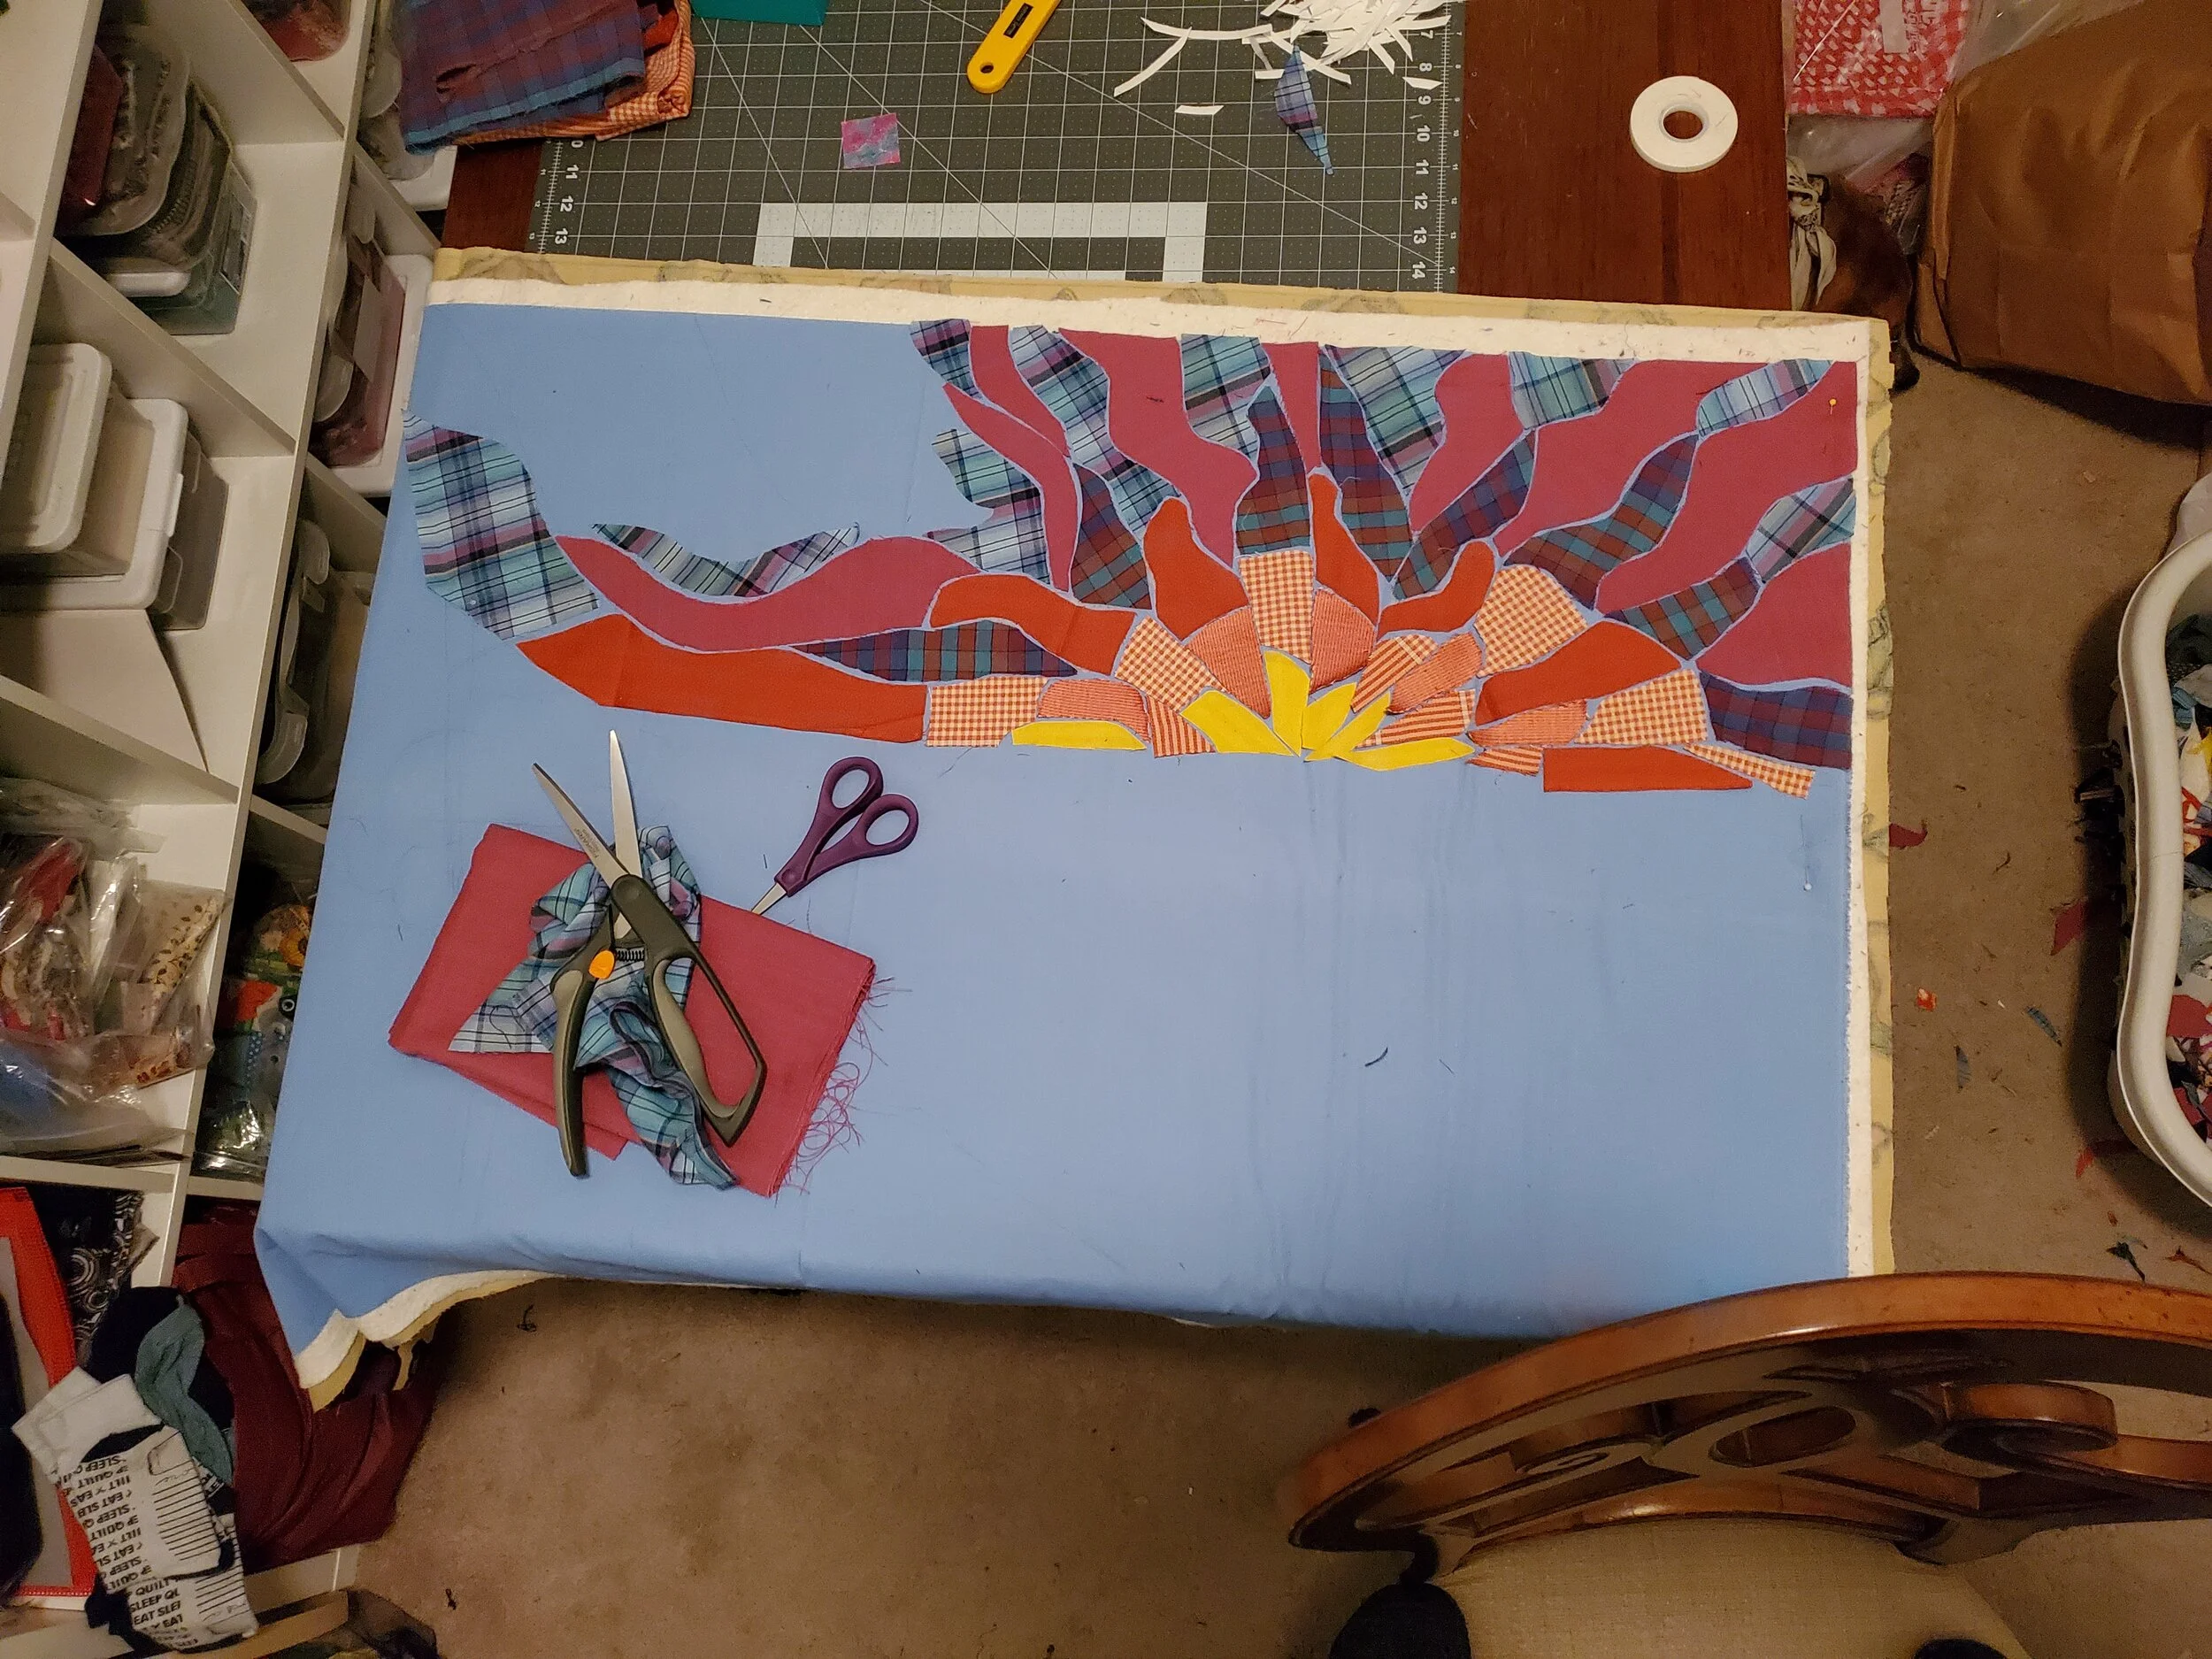
Color Selection and Layout

The next key step was selecting colors and laying out fabric. I really wanted to capture the ombre-like effect of the sunset lighting up a blue sky right before the sun is covered by the horizon.
One of the challenges of working with scraps is figuring out how to incorporate and coordinate predetermined patterns and colors. Personally, I really enjoy the mixing and matching of fabrics, colors, and patterns to find a unique color story for a particular work.
Because I find joy in this part of the process and sustainability is a large influence on my art practice, I don’t often purchase precut fabric bundles. Rather, I tend to raid the stash clean outs of other quilters, closet cleanouts of friends and family, or even hit up the Goodwill for textiles to use.
Side note: According to the EPA, landfills received 11.3 million tons of textile waste in 2018. By using scraps for quilt-making, I like to think I’m helping reduce textile waste in some small way… Source
Building Rays of Sun

After sketching the guides onto the blue background or “grout” fabric, Solid yellow fabric, as the brightest point of the sunset, was laid down first. The orange fabric used second was solid on one side and patterned on the other. I loved both sides so much that I had to alternate right and wrong sides when laying the pieces down.
At some point between the sketch and this stage, I had decided to not use typical geometric mosaic shapes. Rather, I felt that cutting the ‘sky’ fabrics in a more wavy, improvisational way would help to capture the energy of sunlight coming off the horizon.

My textile scavenging tendencies often mean that I acquire very random and interesting looking fabrics. In the case of Grand Canyon Sunset, I had collected some fantastic geometric patterned scraps, which had been cut from both men’s and women’s button down shirts, that fit just perfectly as transition pieces between the solid colors!
Another challenge faced when cutting the patterned fabric for the light rays was the direction of the cuts. To help emphasize the direction the light was shining, the shapes had to be consciously cut in a way that the pattern of the fabric would draw the eye back to the horizon.


Building the Grand Canyon
Once the sky and sunset were completed, it was time to build the Grand Canyon itself. This was where the fabric that inspired this work really got used.

Craggy shapes reminiscent of the vistas in the Grand Canyon were cut first. I intentionally left a sliver of the blue background fabric peeking out from the center to symbolize the mighty Colorado River. Each vista was cut small to large and layered to add to the perspective of distance and give the viewer a sense of scale.
Because this was set at sundown, it was critical that the reflection from the sun appeared to ‘hit’ or reflect off the vistas. I used the scraps from the solid fabrics in the sky to generate a halo of light hitting each vista. This effect also adds to the illusion of the vast distance across the Grand Canyon.
Designing the Watchtower & Mary Colter

The watchtower was probably my favorite part of making this work. Not only was researching the history of the watchtower illuminating, but it was an area within the work that really lent itself to experimentation with new (to me) techniques.
I don’t often have fully fledged out ideas for my art quilts when I first start out. Therefore, I have to do some research at various stages throughout my art making. But as an artist, professional researcher, and trivia-nerd, I really enjoy taking a moment to step back and either learn more about my subject or learn something entirely new. To me, this mid-artwork research adds depth and flavor to the work in unexpected and exciting ways.
Which is where Mary Colter, her lasting influence on design, and how her groundbreaking work at the Grand Canyon helped to open up architecture as a profession for women come into play. I found her story so inspirational, I even made a video discussing her accomplishments and influence, and how she has become an inspiration to me. Click the button below to check it out!
Image: Mary Colter
Image Source: https://en.wikipedia.org/wiki/Mary_Colter

I find a lot of inspiration in architecture, especially buildings that used bricks or stone for the façade. And the watchtower was no different. Because Mary Colter had used the natural stone found around the Grand Canyon, I really wanted to honor her design choice and incorporate this amazing texture into my quilt.
Earlier, I mentioned experimenting with two ‘new-to-me’ quilting techniques; trapunto and thread painting. In making the watchtower, I really got to play around with these two very different techniques and managed to capture the amazing stonework texture of the watchtower.
So, let’s begin with some definitions of these two techniques. Trapunto is a technique which utilizes at least two layers to create a raised surface on a quilt. Also called “stuffed” technique, trapunto can really give quilted pieces an almost 3D effect, as well as add dimension or texture to your quilts.
Thread painting is a free motion sewing technique used to creating lines, areas of color and texture or embroidery designs and motifs by machine. Threads in various colors and weights are used to stitch on top of a base fabric. The maker stitches back and forth across the design area, layering the stitching and filling in shapes and motifs to create the design or desired effect.
So how were these two techniques combined to create the watchtower?
With a sketch first of course! The watchtower was initially sketched on tracing paper. I chose tracing paper for the sketch because I planned to use it as a direct sewing template. With tracing paper, the needle in the sewing machine would easily pierce through it with minimal wear to the needle and the paper would very easily tear away without ripping out or damaging stitches. With the amount of detail in the sketch, I was also worried that if I tried to transfer it on to the fabric via chalk or transfer paper, I would lose those gorgeous lines…

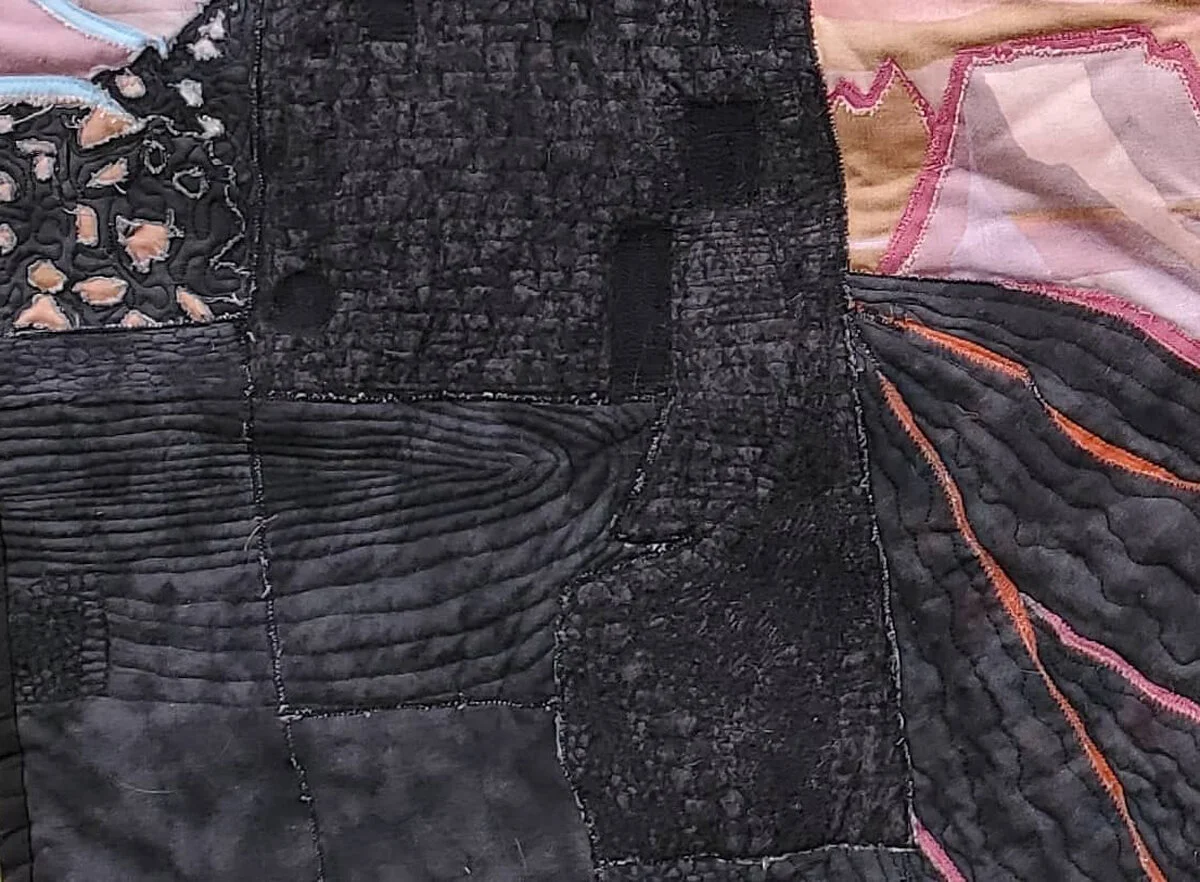

After completing the watchtower sketch, I built the layers for the fabric watchtower by laying a smaller strip of batting on top of a larger piece of batting. Both batting layers were then covered by fabric and topped with the sketch. A smaller strip of batting was used down the center of this piece to add depth and assist with the illusion of the cylindrical form of the watchtower. Once the bits of batting, fabric and sketch were aligned, it was stitching time! I spent about two days “tracing” the stone texture into the fabric that would become the watchtower. Next, the batting was cut away from the doorways and window areas of the watchtower. I had to stop here because there was the small issue of the foreground to figure out before I could use thread painting and applicae stitching to attach the watchtower to the overall work…
To The Finish Line!
Next step was figuring out the foreground. I couldn’t attach the watchtower until the foreground had been sewn down. Another research point! After looking at several photos (even some real-time Google map views), I realized that it would make sense if the foreground was also in the marbled black-grey fabric I had used for the watchtower. That being said, it still needed to have some light reflecting off the cliff face as it descended into the canyon. Since this portion would be further from the sun on the horizon, it seemed logical that this would be touched with the darker reds and purples of the sunlight. Using solid strips, I built the inner vistas of the canyon with some funky cutting across the top and used free motion quilting to give the strips a rocky, rugged feel. The cliff face jutting from the bottom of the tower, along with their strips of light were then laid overtop the inner vistas and sewn down.
Every image of the watchtower I saw had some type of plant near the back of the tower close to the cliff face. So, to create the plant, I dipped back into the “holey overlay” (as I’m calling it) technique I used to create the water for River Memories. I love that this was just as successful to generate the idea of light coming through branches here as is it was in creating light reflections off of the water!
Everything was now in place for the watchtower to be attached. After pinning it in place, I thread-painted the windows and doorways of the watchtower using black thread. By ‘painting’ these areas black, they receded into the watchtower, adding even more depth and dimension to this area of the quilt (Is it obvious that I’m head-over-heels with this watchtower yet?). After thread-painting, I used a zig-zag applicae stitch to secure the watchtower to the work and bound the quilt, completing the piece.

Final Thoughts & Reflections
Grand Canyon Sunset was a fun quilt that took nearly three months to complete. To achieve my vision, I really had to think creatively. In addition to learning learned many new skills, I gave myself permission to try combining various techniques together. That was something I had not seen in quilting before and I think it produced an amazing result. The process of making Grand Canyon Sunset was exhilarating and the successes of the experiments in it generate tons of excitement in me for future works.